Wednesday, June 26, 2013

Another Strawberry Surprise...........

I'm on a roll with strawberries.  Strawberry icecream, strawberry short cake, strawberries dipped in chocolate (my favorite), etc.  I bought some last week and they were huge and sooooo sweet....yummy!  Time to get some more!

For this "Thank You" card, I wanted to show you how versital the Life in Pictures digital kits can be.  I used the LIP kit-Berry Sweet from Peppermint Creative.  Right now it's a FREE download on the Peppermint Creative Facebook page.  If you haven't been there lately, you should go here to check it out.  Miss Mint has added several new LIP kits.  If you are busy and on the go, this is the way to go.  They are perfect for the digital or hybrid scrapper.


I made these for my friend that lost everything in the tornado.  I'm going to give them to her with the Silhouette Portrait that some of you wonderful ladies donated to.  I can't thank you enough for your donations and prayers.  There is still ALOT to do, but they are on they're way to getting things in order. 


I used my handy dandy silhouette cameo to design and to cut out the little strawberry for some dimension.  The base of the card was the 4x6 brown polka dot card that had the pink strip on it already.  The red "you are so berry sweet" was a embellishment already made in the kit.  I added "Thank you" and that is it!! 

Used pop dots for some dimension.


Thanks for stopping by! 

 Don't forget to check out all the new kits at Peppermint Creative.

I hope everyone is having a great summer / offset tutorial

What memories do you have of summer?  Vacation, popsicles, flip flops, swimming pools and of course, for some, picking (and eating) fresh strawberries.  Even though I have attempted many times on my own to grow strawberries and have NOT been successful, I always enjoyed picking them from the neighbors garden.  So when I saw that this weeks theme for The Cutting Cafe' was strawberries, I was very excited. 
 
We had the following three sets to choose from:  STRAWBERRY TREAT BOX or STRAWBERRY SHAPED CARD...TEMPLATE - CUTTING FILE or BERRY SWEET GREETINGS....PRINTABLE STAMP SET.  I love them all so it was hard to decide what set to use. I finally decided to use the Strawberry shaped card/template/cutting file.   This set comes with 4 sentiments and an matching envelope...the strawberry shaped card is approx. 4.5 by 5.5 inches..this file comes in the following formats: wpc, pdf and svg

Strawberry sentiments
These are the sentiments in the set 

~A little Sneak Peek~

You can see some of the detailed layering here.  I used pop dots to get dimension.


 For my card I used Ali Edwards Holiday collection (red).  I'm not sure where the green is from.  I downloaded when digital scrapbooking and hybrid crafting was new to me.  The cute flower is from MissMint_OopsyDoodle-flower11.  I used my silhouette cameo to cut everything out. 

I love the "stitched" look around the berry and leaves.   To learn how to do this see the tutorial below.

Here is a quick tutorial on Offset and Internal Offset.


 To start with you open the svg file into Silhouette Studio.  You will need to ungroup them first.  After you ungroup them, you will fill the stem part with patterned paper. The patterned paper icon is at the top of the screen with the polka dots in the box.  This will then pop up the choices of paper on
the right had of the screen.


I liked the "outlined" look for this project.  If you do not want to the outline to show, click on the multicolored lines at the top of the screen.  This will pop up a line color menu on the right.  The little box with the cross marks through it is the "no-line" feature.  You can also change the color of the outline here as well.


 Here is where you would change the style and thickness of your lines.  Click on the button with the black lines at the top of the screen.  This will pop up the menu on the right for several options.


After filling your shape with the patterned paper, the next step is to choose the offset button at the top of the screen. (his is the first step towards the dashed line)   Once it is chosen It will give you two options...an offset (which it on the outside of your shape) and the other is the internal offset.  This is the one we are doing for this step.  You will also need to slide the offset distance bar.  This will be where your dashed lines will end up.  Slide it around and you will see what it does.


Now for the dashed line.  You pick the button with the black lines at the top of the page.   Once it is picked, the option box on the right will pop up.  You can chose your line here and the thickness of your line.  Just play around with it.  If you don't like it, remember the "undo" button is unlimited.


Now we are going to an offset.  This give you that nice crisp white part around your image.  It's also known as the Sticker effect.  To do this, you will pick the offset button at the very top of the page.  After that is chosen, the right hand side will pop up.  This is where you will chose the distance for the offset.  You may want it closer or you may want it further away....again, just play around with it.
The next frame shows you what can happen if you pick the wrong layer.


When you pick the offset button, make sure the correct layer is picked.  The dashed lines is considered a layer and if you pick that layer, you will get the offset with more dashed lines. See the picture with the big red x on it.   You may have to move it around a bit to get the image and not the dashed lines. 


Now you will want to pull the off offset layer to turn it white.  To do this, you will pick the paint bucket at the top of the page.  It will pop up the color choices on the right hand of the screen.  After picking the color, line them back up.  Select the whole image and group it together.  The group button is at the bottom left of the screen.   The last picture is to show you that the outer layer is white. 
Now that you have completed these steps for the stem, you can continue to do the same thing with the strawberry.  Also once you get the first two steps done...right before you do the offset (outer) you will want to group together and pick The scissors to pop up the cut menu.  Make sure you do a no cut on those.  Once you have your outer offset done and group them all together, pick the "cut outer edge"  This way it will only print around the offset (very outside), giving you that "sticker" look.


  I hope that you enjoyed this Offset tutorial
I added a flower at the bottom of this card just to have a different look.

Stop by The Cutting Cafe' Blog.  There you will get to see all the other ladie's projects.  I can't wait until Wednesday's to see all the beautiful projects.  Don't forget to leave a comment for a chance to win up to 3 sets from The Cutting Café. 

Wednesday, June 19, 2013

Oh my boys are going to kill me!

I made this layout using LIP sets from Peppermint Creative.  Life in Pictures (also referred to as Project Life) seems to be the way to go.  I love that you can put a page together so quickly.   And the kits don't have to be limited just to layouts.  You can go hybrid and make note cards, thank you cards, fridge magnets, etc. 

The following sets were used on my layout. 
LIP KIT: Funktography Edition 3x4" Journal & Filler Cards,  LIP KIT: Funktography Edition Jazzers & Life in Pictures: Prompt Card Templates - Family.  I also used the  
Letterboard Alphabet - Brown (this set is free with just a purchase of 1.00)

LIP KIT: Funktography Edition 3x4" Journal & Filler CardsLIP KIT: Funktography Edition JazzersLife in Pictures: Prompt Card Templates - Family

Letterboard Alphabet - Brown

 
I used the brackets from this set.  I put one at the beginning of the page and one at the end of the page.  At first my friend didn't like it and then I explained that everything within the brackets is the story I'm telling.  She liked it then.  Thought about taking them out, but I kinda like them.

Don't forget these Brown Letterboard alphabet can be yours for FREE.  With just a $1 purchase.  You can beat that. 
And right now there is a couple of other free things.  One at Peppermint Creative and another on Facebook.  They go together...so co check it out.


Here is my page:  The boys are going to be upset I used them....but I will call it payback for all the times they don't listen to me.
 

Thanks for stopping by!!  I hope you enjoyed my page!!!!  Please feel free to leave comments!  I love to read what everyone has to say.  This is one of my first pages in quite some time.  Like I said, I thought it was fun, but I'm sure they wouldn't agree~

Don't forget to go to www.peppermintcreative to check out all the other kits that Miss Mint has been working on.  She rocks.  There are lots of new LIP kits and of course this freebie below.

This is the amazing free kit!  I love it. You can check out the Gallery to see some really great layouts and hybrid pages.
 

Tuesday, June 18, 2013

Welcome to our neighborhood.....

This week's project for The Cutting Cafe' I'm using the Welcome Home printable stamp set.  The timing couldn't be more perfect because two families have just moved in around our block in the last few days.  Time to get to baking my yummy banana bread.  I'm going to put into a sack and attach the cute tag that I made with this set to it. 
 

The Welcome Home printable set includes 55 images!!!


Welcome home 2
 
 
Here are a few more stamps in the set 

Welcome home

Welcome home 3

Here is the tag that I made to put on my banana bread

I used washi tape for the first time.  I have about 10 rolls but have never used it before.  It's the green with white polka dots.  It's also VERY easy to use.   I also used my silhouette cameo to cut the images out.  Part of it I just used a pair of scissors to cut it out. 
 
This set is so versatile!  Welcome Home, Welcome to the neighborhood, New Home, SOLD, etc.  So many possibilities.  Maybe one day I can use this set for "We've Moved". 
 
 
Now I better get to baking that banana bread. 
....And don't forget to go and check out the rest of the projects from The Cutting Cafe's Design Team.  This team is such a great group of very talented ladies.
Win free sets by simply leaving a comment on The Cutting Cafe's Blog.
 

Thursday, June 13, 2013

Silhouette Welding Tutorial

Hello everyone!  I hope that everyone is having a great day.  It's one day closer to Friday and that makes me happy.

I made this card for my Godchild to congratulate him on a job well done in school.  My husband said "You made it, but you probably won't get it to him until school starts again."  He knows me well.  My intentions are good.  Anyway, I proved him wrong!  I made it and mailed it along with my niece's card the next day!!  Wooohooo.....there is a first for everything and that was definitely a first.

Some of my silhouette/facebook group friends ask me how I made the card.  I'm pretty new to writing tutorials, so I hope I didn't miss anything.  I've written a few for Peppermint Creative (you can see them here and here).  The more you write, the better you get....so here it goes!!


You Rock!!!


First I opened a star that I bought at the Silhouette online store.  I'm sure there are plenty of free, but I needed this one pretty quick.  I used it to make this project for my friend, It was her Dad's 70th birthday.  It was also my first project. 


Next thing you will do is open this image on a new page. You can probably do it all on the same page and move images that you aren't currently using off to the side.  However, I like to open a new page. 
 
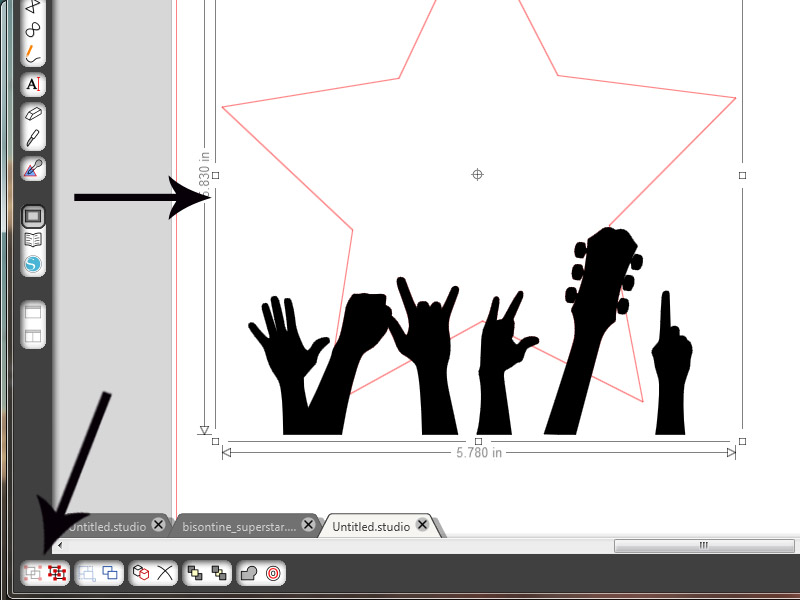
This is what it looks like (above) when you open it.
This was a free image I got here


Next step is to pick Select Trace area (top red arrow).  You will drag the square to cover the entire image until it is all highlighted.  Once that is done, you will UN check (sure there is better terminology)  the High Pass Filter (second red arrow).  After un checking the high pass filter, go to the threshold and slide it all the way to the right or until the entire image highlighted yellow.


 After highlighting it all you will select the trace outer edge option.  You can see the red lines around the image.  It should look like the image above. 


After selecting the trace outer edge option, you will drag them apart. At this time you can move the original image off to the side if you like the looks of it (the texture) or delete it.  I deleted the image because I wanted the solid look.


You should end up with an image that looks like this.  Next step is to fill in the color.


Next, make sure that your image is selected.  I have tried doing new steps without making sure the image is select and nothing happens.....of course....then it clicks....I forgot to select it...UGH!  Okay so now it's time to select the paint bucket at the top of your screen.  Once you hit the bucket tool, color options will appear on the right.  Pick black, it will fill your image with the color selected. 


Now you do a copy and paste of the image.  You will have two images on your screen.


The next step is to make sure one image is outlined and one is not.  To do this you will select the scissor tool at the top of the page.  This will pop up the cut menu.  It will show that both images have cut lines, you will want to turn the cut lines to one of them off.  Highlight one of them and then select the NO CUT button.  This should remove the red lines. 

 
 Following so far? 
I know it's a lot of info and some of it very basic, but I trying to think about the ladies that  have never done these steps before. (and/or need step by step instructions like I do!) 
Okay, so let's continue...this was the confusing part for me. 


Okay, here is where it gets tricky.....
We need to bring both images to the same page.  So just copy and cut the image of your star and paste it to the page where the "hand" images are.
 
1. Move the "no cut" image off to the side.  You will be using at the end so you can just leave it off to the side for now. 
2. You will now highlight the whole hand/guitar image. 
3. Once it's highlighted you need to RELEASE compound path under the modify menu


Now you are going to slide the bottom image up to the star and place it where it looks nice to you.
Highlight the whole image.


Next you need to click on Modify button at the top menu bar.  It will pop up options on the side.  Now hit the subtract button under the modify window.   After clicking on the subtract button, it will look like the picture above.   The pictures are joined and the red are where it is going to cut. 


Now select the whole image (star) and group it together.  The group button is all the way on the bottom left.  This makes it all one piece instead individual pieces and you are able to move it around.
 
 
 Next take the image that was over on the side of your page and line it up with the top image (star) Remember to make sure the cut lines are off on the image you are dragging back up the where they were welded together.


Now that you have it all lined up.  You will select the whole image together and Group them together.  


This would be a good time to check your cut lines to make sure it is done right.  It should look like this image.
 
 
Now after you have accomplished ALL of these steps, you are ready to make the rest of the card.  I used a card base from the Silhouette Store.  The digital paper is from Peppermint Creative. It's listed below.  It's one of my favorite paper packs.  Actually, I have several favorites.
 
Houndstooth Heaven Papers
 
Now you have everything you need to make this card.  I hope that the steps are all there and that you can understand my instructions.  Please feel free to ask me any questions.  I know there may be an easier way to do this.  I discovered a few while making this tutorial. 
 
 
Have a great Day!!!
Tanya