How to Make a Floating Ornament
Supplies
Used:
Dear Santa
Element pack
Candy Cane
digital paper
Transparency sheets
White vinyl
Silhouette
Cameo
Silhouette
Studio Designer Edition
Two way glue pen
White glitter
Glass
ornament
I used
Studio Designer Edition and my Silhouette Cameo to make and cut my design, but you can use any photo editing
software.
Making the
Template
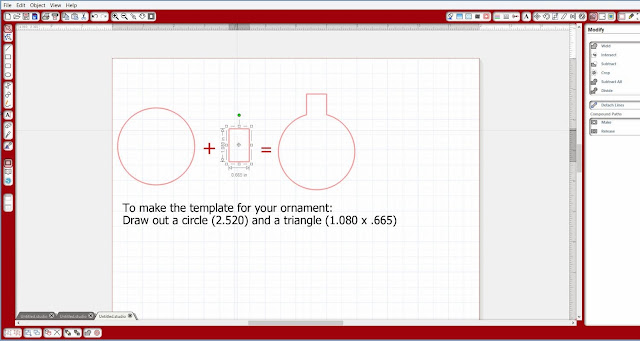
Step 1:
Draw a Circle and a triangle by using the drawing tools on the left side of the page.
Step 2:
The dimensions
for your circle is 2.520 and the triangle is 1.080 x .665
You can put type the dimensions in by using
opening the scale window on the right side of your screen.
Step 3:
Weld your
two shapes together using the welding tool.
Now that you have your template made you can move on to the next steps.
Designing
the Inside of the Ornament
Step 1:
For this
ornament I used the Santa out of the Dear Santa element pack and paper from the
Candy Cane digital paper. To start, draw
another circle the same size as your template and fill it with the Candy Cane
graffiti green paper. Once filled, go to
your advance options.
Step 2:
To make it
look even more dimensional, I changed the transparency of the paper. After choosing the advanced options, find the
transparency bar and slide it to 45%.
Step 3:
Now open the
Dear Santa Element pack and select the Santa.
Resize it to fit into the circle and drag it over the top of the paper.
Printing the
Ornament
One of the
neat things about the Silhouette Cameo is that it has a "Print and
Cut" feature. To do this your have
a couple of steps you need to follow.
Step 1:
The first
thing to do is to pick the size of your paper.
My printer only prints up to a 8 1/2 x 11, so I choose the letter
option.
Step 2:
To be able
to cut after printing you have to turn the registration marks on.
Step 3:
The transparency
sheets are very expensive, so I made sure to fill the page before I hit the print
button.
You can see here what the transparency looks like after printing. I laid half of it on a white sheet so you can
see the difference.
Cutting out the Ornament
If you
aren't using a cutting machine, you can stop here and simply print your image
and use a pair of scissors to do your cutting
(you don't have to have a cutting machine to make these ornaments).
Step 1:
Now you will
choose the Cut Setting Options. Here is
where you will choose the speed, thickness and blade setting. I chose a speed of 3, thickness of 33 and set
the blade at 6. Sometimes this is where
you have to play around with the cut settings because materials differ in
thickness and textures.
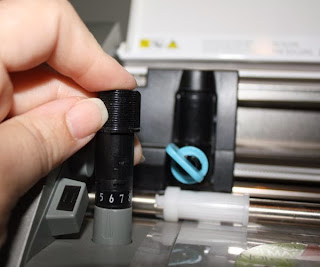
Make sure to
manually change your blade setting. I
have changed it on the screen but forgot to change it manually and had to go
back and cut it again.
Step 2:
After
printing you will put the sheet on your cutting mat. Because the sheets are transparent you will
have to put a small piece of paper behind the registration marks so that the machine can read them. I got this tip from The Silhouette Challenge group. I don't remember who suggested it, but it does work. Thanks so much for the tip.
Here is what
it looks like after it is cut.
Step 3:
You will cut
an additional template out in white vinyl.
This is so that your image will show up.
Be sure to change your cut settings for vinyl. Also manually change your blade.
Step 4:
Apply the
vinyl cut out to the printed acetate sheet.
To do this, I laid the vinyl down with sticky side up. I then started at one end matching it up and
sticking it down. You may have another
way that works for you, but I have found this way to work best for me.
Embellishing
Step 1:
Use your
glue pen on the beard, hat and cuff parts.
Step 2:
Add the
glitter.
Tap off excess.
Assembling
Step 1:
Now just roll the insert up.
Step 2:
Take the top off the ornament, put the insert in and put top back on and your finished.
If you need to straighten your image up a bit after it unrolls, simply use a pair of tweezers.
There you have it!! Isn't it cute? The possibilities are endless.
I made a bunch for Christmas gifts for Family and friends in Louisiana. They were a hit!!
Extra steps:
You can cut ribbon and add to the top of your ornament. I was putting pieces of ribbon through the small hole at the top and it kept popping of the ornament. I read on one of the Facebook groups to take a piece of floss and tie your ribbons to it and then thread through the hole at the top of the ornament. I haven't tried it yet, but it sounds a heck of a lot easier.
You can also cut
vinyl and put on the front of the ornament to make it bit more personal.
Thanks for stopping by my crafting space!!
Hope everyone has a VERY MERRY CHRISTMAS!!


